Categories
Uncategorized

Azure Functions hosting options and best practices

Azure Functions hosting plans for each OS.

The process for creating Azure Functions is straightforward on the Azure Portal. The only confusing option you have to consider during the function creation is which hosting model to choose from the available choices. There are four different hosting plans to choose from, where you will also be able to determine which OS to host your functions. In this blog post, I’ll have a review of different choices and what suits you best. This is what you will see on Azure Portal when choosing your hosting plan:
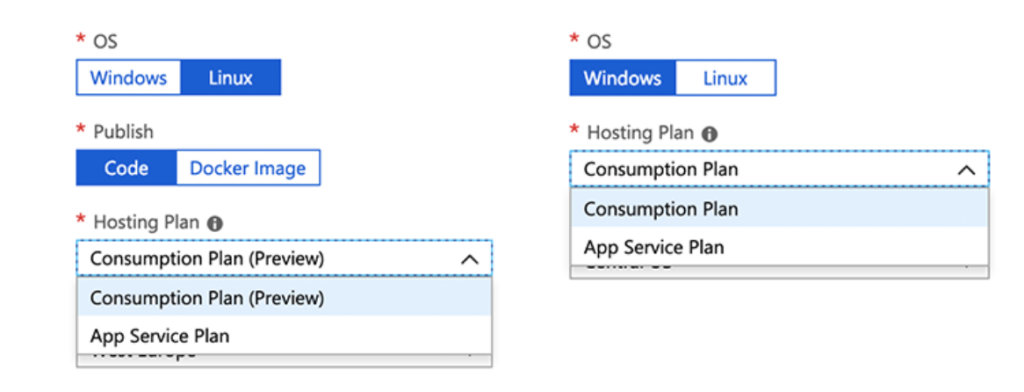
Azure Functions hosting plans for each OS.

Consumption plan

Consumption plan is open on both Windows and Linux plans (Linux currently in the public preview). If you are new to the Azure Functions or need the function just up and running, I would recommend picking this plan, as it will make your life easier and you can get to the coding part rapidly. With this option, the function will dynamically allocate enough compute power or in other words, hosts to run your code and scale up or down automatically as needed. You will pay only for the use and not when for idle time. The bill is based aggregated from all functions within an app on the number of executions, execution time and memory used.

App Service Plan

App Service Plan is the second choice both available on Windows and Linux OS. This plan will dedicate you a virtual machine to run your functions. If you have long-running, continuous, CPU and memory consumable algorithms, this is the option you want to choose to have the most cost-effective hosting plan for the function operation. This plan makes it available to choose from Basic, Standard, Premium, and Isolated SKUs application plans and also connect to your on-premises VNET/VPN networks to communicate with your site data. In this plan, the function will not consume any more than the cost of the VM instance that is allocated. Azure App Service Plans can be found from Microsoft’s official documentation.

An excellent example for choosing the App Service Plan is when the system needs continuously crawl for certain data from on-premises or the internet and save the information to Azure Blob Storage for further processing.

Containers
Azure Functions also supports having custom Linux images and containers. I’ll dedicate a blog post for that option shortly.

Timeouts

The function app timeout duration for Consumption plan by default is five minutes and can be increased to ten minutes in both version one and two. For the App Service plan version one has an unlimited timeout by default but the time out for version two of functions is 30 minutes which can be scaled to unlimited if needed.

After creating the function with a particular hosting plan, you cannot change it afterwards, and the only way is to recreate the Function App. The current hosting plan on the Azure Portal is available under the Overview tab when clicking on the function name. More information about pricing can be found from the Azure functions pricing page.

Categories
Uncategorized

Deploying AWS CodePipeline solution for Python and Java Lambda using CloudFormation

Understanding AWS Developer Tools

CodePipeline = CodeCommit -> CodeBuild -> Deploy

If you never heard about the AWS Developer Tools, I will briefly talk about this set of tools.

AWS CodeCommit

This service/tool provides you a private git repository. Much like Bitbucket or GitHub. You just create a new repository (like a new project in GitHub), clone the repository in your computer and start to put files in there using git commands like commit, push and pull.

The credentials solutions in AWS for CodeCommit is HTTPS Git credentials inside IAM User. If you have any difficulties to create this credentials, take a look in the CodeCommit user guide at https://docs.aws.amazon.com/codecommit/latest/userguide/setting-up-gc.html. Be aware that you can have up to 5 users with Git Credentials for free in AWS and pay $1 for any additional user.

AWS CodeCommit Repository

So you created the repository, put your code on it, developed and tested in your favorite IDE but that’s not how you want to deploy the code in your services. You some times need it to be compiled, like Java, or to be packaged with the needed libraries, like Python. That’s the job of the next service.

AWS CodeBuild

The CodeBuild service allows you to get something (usually your code) from a origin and generates for you an output (usually a file).

To tell the service how it can generate an output for you, you need to specify an buildspec.yml, within your project, with the specifications and commands to generate the desired output. It’s much like the generation of a Docker Image with a Dockerfile or the generation of EBExtension commands for Beanstalk.

Below is the generated buildspec.yml that I generate for my Python code:

version: 0.2

phases:
  install:
    runtime-versions:
      python: 3.8
  pre_build:
    commands:
      - echo Build enviromment `uname -a` `aws --version 2>&1` `python --version`
      - echo Started build at `date`
      - pip install -r requirements.txt -t .
      #- mkdir /tmp/
      - rm buildspec.yml .gitignore
      - mv sam.yaml /tmp/
  build:
    commands:
      - echo Building at `date`
      - zip -r /tmp/output.zip *
      - aws cloudformation package --template-file /tmp/sam.yaml --s3-bucket $S3_BUCKET --output-template-file template.yaml
  post_build:
    commands:
      - echo Finished build at `date`
artifacts:
  files:
    - template.yaml
  discard-paths: yes

You can notice that it has a list of runtime versions to run. You can specify your code language version in this section of the buildspec without worrying about how the installation of Python will occurs.

Next you have pre_build commands to do some installations or preparations before the actual build. With Python, I tell the buildspec to install the Python libraries from requirements.txt in the same folder from the code. After this, it will remove buildspec.yml and .gitignore since Idon’t need this to run the Python Code. The last step from pre_build is to move the sam.yaml (AWS Serverless Applicaton Model) file to /tmp/ folder because it will need this file to generate the output.

In the build section, I simply zip all the files and libraries folders to /tmp/output.zip, and next step is to use the sam.yaml model to generate a CloudFormation package that will get the /tmp/output.zip, put it in the S3 Bucket defined in the $S3_BUCKET environment variable and generate an file called template.yaml. This is the template file that CloudFormation will use to create the Lambda Function with the code generated in /tmp/output.zip.

For whom don’t about the SAM files, it’s a simplification for CloudFormation to create serverless application within AWS. It can generate API Gateway, SQS queues, Lambda Functions wih little effort.

Take a look in the sam.yaml file:

AWSTemplateFormatVersion: 2010-09-09
Transform: AWS::Serverless-2016-10-31
Description: SAM Template for Deploy Python code to Lambda
Parameters:
Name:
Type: String
Resources:
LambdaFunction:
Type: AWS::Serverless::Function
Properties:
FunctionName: !Ref Name
CodeUri: /tmp/output.zip
Handler: main.lambda_handler
Runtime: python3.7
MemorySize: 128

Timeout: 30 # seconds, 900 max

It has a parameter called Name, that is the name of Lambda Function. And I define some parameters for this Lambda Function.

I tell where is the code for this function (remember that the output from buildspec.yml is /tmp/output.zip), what Runtime to run, what is the memory size and timeout in seconds. With this little code it can create a CloudFormation template that create the Lambda Function with the minimum needs to run.

But after you compiled or packaged your application and generated a CloudFormation script, you need to run it. In the next step you need the next service to tie up all this complex input and output files.

AWS CodePipeline

Basically CodePipeline receive some input, it can be your code on CodeCommit, BitBucket or GitHub, or some file in S3; and generates a output or a desired state. It also can have some manual approval between state to manual authorize a production deployment or it can be automatic to deploy in staging environment.

The structure that I created for this test is show below:

CodePipeline with manual approval

It has as source the CodeCommit repository that I created with the stage name Source. The code from CodeCommit is an input for the next stage, the Build stage. This Build stage calls the CodeBuild service and generates an CloudFormation template as output and this template is an output for Deploy stage. It could have an test stage to do some automatic testing or an staging deploy to deploy the build in stating environment but I wanted to keep it simple.

The Source and Build stages are the CodeCommit and CodeBuild service as I wrote above but the Deploy stage is very easy because CodePipeline handles to you the CloudFormation deployments.

CodePipeline supports a few types of CloudFormation deployment, in this test I used CHANGE_SET_REPLACE in Deploy action (it only validates the CloudFormation template and don’t create the resources) and CHANGE_SET_EXECUTE in ExecuteChangeSet action(this command creates the CloudFormation resources).

CloudWatch Rule Event

Last but not least, you have to setup a CloudWatch Rule Event to triggers your CodePipeline pipeline when there’s a new release in CodeCommit repository. This will very important piece to create the start the automation process, without it you would have to call the CodePipeline start execution process via console or command lines.


CloudFormation

So, I talked about the AWS Developer Tools and now you have some idea of how to implement and deploy a test solution like a did. But what if you want to deploy dozens or hundreds of lambda or microservices solutions; how to keep/mantain all this DevOps workflows with CodePipeline ?

The solution is use CloudFormation to create a bunch of templates that covers all of your needs.

You may not notice so far, but all this services from AWS Developer Tools services roles, execution roles, policy permissions, environment variables, input/output from CodePipeline … To keep all this connections secured and replicable you have to use some Infrastructure as Code; it can be CloudFormation, Terraform or Ansible. In this case I’m using the CloudFormation templates to do the job.

CloudFormation Graph

If you look at CloudFormation graph, you can see the relationships between all the services. The template creates 4 IAM roles (1 for CodeBuild, 1 for CloudWatch Event Rule, 1 for CodePipeline and 1 for CodePipeline to execute CloudFormation SAM templates), 1 CodeBuild Project, 1 CodePipeline pipeline, 1 CloudWatch Event Rule and 1 S3 Bucket that’s used for the services.

Since I built this CloudFormation template and everything is working as it should, I started to changing the template and try other solutions. I create 2 templates for 2 programming languages, Python and Java, with manual approval or automatic approval. My Java solution is using Maven to package the code into a .jar but you can change it to use other solutions, like standalone .jar libraries.

Categories
Uncategorized

AWS SageMaker – An Introduction

Computers. They’re tricky things — some days you can’t get enough, other days you have more than you need. You might think you’re just installing a new open source project, but four hours later you’re still wrangling the installation manager. You’ve got a great model, but no framework for building that into an application. Now, let’s re-imagine that experience, but using a tool built specifically for you. Welcome, Amazon SageMaker.

Amazon SageMaker is a fully-managed machine learning solution coming from AWS. It decouples your environments across developing, training and deploying, letting you scale these separately and optimize your spend and time. Tens of thousands of developers across the world are adopting SageMaker in various ways, sometimes for the end-to-end flow, other times to scale up training jobs, others for the dead simple RESTful API integration. Here I’ll walk you through the major aspects of SageMaker classic, as I call it, or the fundamental elements of SageMaker.

SageMaker starts with a notebook instance, this is an EC2 instance dedicated to running Jupyter, your environments, and any extra code you need for feature engineering. Notebook instances come automatically configured with your AWS credentials, such as boto3 and the AWS cli, so you can easily connect to your data in S3, Redshift, RDS, DynamoDB, Aurora, or any other location with just a few lines of code. For extending access from your notebook instance to other AWS resources, just make sure to update the ExecutionRole assigned to your notebook instance.

SageMaker Notebook Instances

Notebook Instances on Amazon SageMaker

SageMaker provides fully-managed EC2 instances running Jupyter, with 10+ environments, 1400+ packages, and hundreds of examples.

It’s best to start your notebook on a smaller EC2 instance, generally the ml.t2.medium is a good choice. This is the absolute lowest dollar amount per hour you can get for a notebook instance.

But once you’ve started diving into your feature engineering, when you realize you actually need a bigger instance or more disk space, you can easily resize the EC2 instance hosting your notebook. You’ll need to turn it off, update the settings, then turn it back on again. 7 minutes round-trip, but well worth the payoff.

Don’t forget to turn your notebook instance off, as the cost is per hour, not per use. Usually it’s best to implement a Lambda function to turn these off automatically, either based on a time of the day, or by notebook utilization itself.

Now here’s the fun part — you can get dedicated EC2 instances for each of your models while they train. These are called training jobs, and you can configure them whether you’re using one of the 17 built-in algorithms, bringing your own model in a Docker container, or using AWS-managed containers under script mode.

Training Jobs on Amazon SageMaker

All of the details about your training job are sent to CloudWatch, and your model artifact is stored in S3 on completion.

Each training job is configured with an estimator on SageMaker, and there are zero restrictions on needing to use one of the 17 built-in algorithms. They may offer some time advantages, because you’re writing less code by using them, but if you prefer to bring your own model with TensorFlow, MxNet, PyTorch, Sci-kit Learn, or any framework, SageMaker offers examples to see how that works.

Every training job is logged in the AWS console, so you can easily see which dataset you used, where it lives, where the model is, and the objective result, even 6+ months after you finished.

Trained your model somewhere else? No worries! You can actually bring any pre-trained model and host it on SageMaker — as long as you can get it in a Docker container, you can run it on SageMaker.

Use SageMaker to Create a RESTful API around any model

If you’re bringing a model in a framework supported by the script-mode managed containers, AWS implements the API for you.

It’ll take 7+ minutes to initialize all the resources for your endpoint, so don’t fret if you see the endpoint showing status “Pending.” If you are putting this into production in response to regular traffic, it’s best to set a minimum of two EC2 instances for a highly available API. These will live behind an AWS-managed load balancer, and behind the API endpoint itself which can connect to a Lambda function that’s receiving your application traffic.

Endpoints left on can also get pricey, so make sure to implement a Lambda function to turn these off regularly if they’re not in a production environment. Feel free to experiment here and pick an EC2 instance that’s smaller, but still robust to your needs. Endpoints come with autoscaling out of the box, you just need to configure and load-test these.

For all of your training jobs, endpoints, and hyperparameter tuning jobs, SageMaker will log these for you in the console by default. Each job emits metrics to CloudWatch, so you can view these in near real-time to monitor how your models are training. Additionally, with the advancements provided by SageMaker Studio, you can establish Experiments and monitor progress on these.

SageMaker Studio provides experiment management to easily view and track progress against projects.

After you create an experiment in SageMaker, all jobs associated with it show up in Studio with a click of a button.

SageMaker Studio was announced at re:Invent 2019, and it is still in a public preview. That means AWS is still fine-tuning the solution, and there may be some changes as they develop it. Because the preview is public, anyone with an AWS account can open up Studio in us-east-2, or Ohio, and get started.

AWS is literally exploding with resources around machine learning. There are 250+ example notebooks for SageMaker hosted on GitHub right here. Hundreds of training videos are available for free across different roles and levels of experience here. If you’d like a deep dive on any of the content in this post, We’ve personally gone through the trouble of outlining all of these features in an 11-video series, hosted here. Check it out!

SageMaker is present by default in every AWS account. You can also create your own AWS accounts and keep your experimenting inside the Free Tier.

Feel free to connect with us hear at Arturo Labs. We would love to hear how you’re implementing SageMaker on your very own or we can have one of our experts help you on your machine learning adventures.

Categories
Uncategorized

Azure for Data & Analytics

It’s no secret. Azure Data & Analytics can be an incredible conduit for realizing business value, implementing powerful new solutions within the cloud, and gaining access to vast amounts of valuable data that is generated every day through your organization’s business activities. With the power of Azure Data & Analytics on your side, you can implement new business applications that can: stream and interpret massive blocks of data, generate powerful reports for better decision-making, see the impact of decisions in real-time, and much more.

There has been a fundamental shift in the way successful businesses scale and process their data, which is, in many cases, one of their most valuable assets. Designing and implementing a platform that can capture — and leverage this data in meaningful ways, can be a daunting yet extremely rewarding task, but is a crucial step in a successful digital transformation strategy.

Here are some common questions your team may ask when brainstorming an implementation of Azure Data & Analytics for your organization:

  • How do key stakeholders within the organization work with IT to capture and define business use cases and user stories for the technical platform?
  • How should the governance and foundation work of our new data platform be established? Who will be responsible for maintaining this platform and ensuring security and best practices in its day-to-day use?
  • How do we expand and build on crucial applications to support capturing and utilizing more business data?
  • Within the new platform, what forms of automation can we implement to decrease costs, improve efficiency, and augment existing capabilities?
  • What are out-of-the-box tools available to us to expand our capabilities with minimal investment?
  • How do we accurately predict and control costs associated with the new business platform and ensure the integrity of our governance is maintained?
  • Who will be responsible for ensuring our business applications are maintained within the new platform?

The list of crucial questions in this stage can seem endless and exhaustive, but it only highlights the need for careful and deliberate decision making when implementing a new technological platform of this type regardless of the planned scope. Regulation compliance, security best-practices, and migration framework contribute to any successful cloud strategy, whether it’s designed for a small business or a large corporation. Whether you decide to work with a trusted and experienced partner or take on the challenge internally with your team, asking and answering the right questions and being thorough in all steps of planning and implementation is crucial to maximizing your chance of success from the start.

Without proper knowledge or experience, planning, and building your organization’s Data & Analytics platform in Azure without professional aid can take months or even years. Dragging timelines, uncertainty in costs, and other factors can delay implementation and reduce confidence in a successful cloud migration plan when there is a limited or non-existent experience to lean on.

At Arturo Labs, we have been working as a trusted partner to help migrate customers of all sizes to Azure and work with them to realize immediate business value from their investments in the cloud.

Whether you are working with a trusted partner or pursuing the cloud platform build or migration alone, the importance of cloud adoption framework cannot be overstated. This framework is a living artifact and represents a reliable source of truth in your cloud strategy. It is a “true north” when considering new opportunities in the cloud and understanding how your organization’s overall IT strategy is adapting. Bolting it on after the build or migration rather than baking it into a cloud strategy from the start will reduce your chances of success.

Just because the cloud adoption framework is defined from the start doesn’t mean it can’t evolve over time to include more stringent and defined criteria as your organization matures and expands in its cloud strategy.

An extensive and carefully planned migration framework ensures your organization has put proper consideration into the numerous challenges and obstacles of a successful cloud migration strategy and demonstrates a fundamental understanding of how the platform will be used to solve business challenges and achieve new goals as they emerge. This work, at least on a foundational level, needs to be done before any VMs are spun up, or any data is migrated to Azure.

Getting into the actual build and deployment of the platform, your organization needs to be able to estimate the right-sized resources your business will need within Azure. Allocating too many resources across Compute, Storage, and other areas of Azure can drive up costs and cause your tenant to burn too hot, diminishing the business value that could be achieved from a properly sized and implemented data and analytics environment. Allocate too few resources, and your platform may slow, drop tasks, and place a constraint on associated business processes.

Constant adjustments, automation tweaks, and refinement of a cloud strategy can ensure ongoing improvement and optimization within the cloud. The result? A *reduction* of uncertainty, unpredictable cost, and un-optimized resource utilization.

Working with a trusted partner to perform a cloud assessment can be an incredible first step to ensure ongoing improvement and optimization within the cloud from the onset.

Within Azure, there are several out-of-the-box Data and Analytics products that can be added to your existing or newly acquired subscription with little to no additional cost. Some of these tools and applications can be custom-tailored to your organization’s needs, and others give immediate access to new capabilities, including how your business is able to use and interpret data from different sources.

You can also build your own custom solutions to address your business problems head-on, using some of these available products and services as building blocks or framework to guide your efforts. Self-guided continuous improvement and exploration in the cloud, while *costly*, can lead to refined strategies and capabilities within Azure — allowing your team to grow their understanding of Azure over time.

Whichever route you pursue, it is important to tie the technology to the fundamental business use cases and user stories which it is trying to solve.

  • How can this solution help key stakeholders make better decisions and respond to market data on a more regular basis?
  • As a manager, how will this platform help me better track the performance of my team against quarterly business goals and planned product enhancement deployments?

Always look to understand the ‘why’ behind any technological solution and understand the ties to crucial business use cases and user stories that drive success to the organization. In this case, business and technology can go hand-in-hand, and when used and evaluated together, can have powerful results. This is the premise of the Azure for Business blog series: to help you understand new ways of considering how business and technology can interact to create exciting new synergies that yield incredible results.

In conclusion, planning an Azure Data & Analytics implementation for your organization can be a daunting task, but there are numerous steps that can be taken to better ensure success from the start. Whether your organization is taking on the migration and implementation single-handedly or working with a trusted partner, make sure to include proper consideration for cloud migration framework, security and compliance, and well-defined governance.